

Pontoon Boat Fish Finder Installation
Unfortunately for those who like fishing and plan to do it on a greater scale than just sitting on the deck with a fishing rod and waiting for something to bite, installing the fish finder they’ve just purchased is a bit more complicated than one would expect.
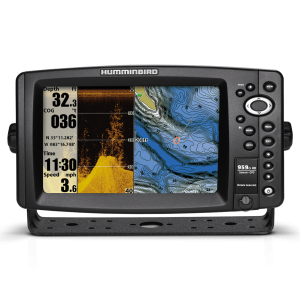
If you’re part of that category, be sure that it’ll take you 3-4 hours and a tech-savvy friend to figure it all out. Luckily, though, we’re here to significantly shorten and simplify this process for you. We’ve compiled data from a couple of tutorials and our tech-savvy friends, as well as the textbook for the Humminbird 859 DI fish finder. This method will work for it perfectly and we also recommend it if you haven’t bought a fish finder already. All in all, you’ll only need an hour or so to complete all the steps necessary.
There’s a thing you must make sure of before installing anything, however. Many retailers don’t sell the transducer together with the fish finder, so please get the transducer as well. Otherwise, all you have is an overpriced GPS.
That being said, let’s get this thing started. Please read EVERYTHING before you do anything: it will spare you plenty of time and errors.
Table of Contents
1. Transducer location
 The first thing you need to do is determine where your transducer should be placed. Generally, transducers for fish finders are designed for transom mount and, as such, most of the people place it on the bracket on the back of either of the pontoons. We recommend that you do so as well.
The second thing is to make sure that there are no electrical interferences. The transducer works pretty much like any other sound equipment, such as loudspeakers and so on and, therefore, it suffers from the same issues. If the electrical signal is perturbed by the electromagnetic field of, say, another electrical wire, there’s a high chance you won’t get accurate readings or simply see nothing on your screen. As such, try not to place the wire or the transducer close to other wires, speakers, and so on. Apparently, livewell pumps can also cause interference, so we advise you to not mount the transducer close to a livewell pump if you have one.
Generally, the transducer also comes with a 20’cord, which is enough for the average pontoon boat. You can purchase an extension if you want and it’s fairly cheap, but ill-advisable. The longer the wire, the greater the chance something interferes with your signal. What’s more, you will definitely experience signal loss on too long a wire. The best thing is to mount the transducer on the same side as your captain’s console, so the monitor-transducer distance is as small as possible. Of course, you can put it wherever else you want, but this is the fastest and easiest method and it also yields the best result.
2. Monitor location
There’s a saying among carpenters: think thrice, measure twice, and cut once. You’ll have to get some holes drilled for this process, so make sure you don’t ruin your dashboard for nothing and think well where you want to place your monitor. There are boats with plenty of space and others that don’t offer such luxury. Think of the best place to put it so doesn’t cover your dash and the angle of the monitor bracket allows you to see it from the back of the boat.
Get off your boat and take a look from below the captain’s console. Make sure none of the gauges, wires, and whatever else you have there will interfere with the wires (we explained why above). Also check where the other wires have been run through, which is generally a bog hole in the deck, under the console. You will use that for the fish finder’s wire as well, so check again whether the length of the wire allows you to do so.
3. Some extra shopping
The fish finder comes with pretty much everything you need to mount it on a traditional boat, but not nearly all you need for a pontoon. There are a couple of extra things you must buy and have ready before installing it. Worry not: this is not a $700 purchase like your fish finder. You’ll get out of this one with only a couple of dollars.
Here’s the list:
- 6 stainless steel bolts. We found that 1/4” bolts that are 1.25” long work just fine. Also, make sure that ALL METAL PARTS ARE STAINLESS. Tool steel, spring steel, Damascus steel, it doesn’t matter; just make sure it’s positively stainless. Otherwise, it can and it will rust, especially if you go out on the sea;
- 6 stainless steel nuts for the bolts;
- 6 rubber washers;
- 6 stainless steel washers;
- 20’ of electrical shroud for insulating your wire. Again, 1/4” works just fine, as it must wrap nicely around the transducer wire;
- 2 power connectors for your fuse box. Check it before shopping so you know what kind of connectors you need. If you don’t have a fuse box with empty slots or you don’t want to connect the fish finder to yours, you may need another 20’ of positive and negative (red and black) electrical wire and you can hitch it straight to the battery;
- Optional: a small tube of silicone and a rubber grommet (for the cords going through the console).
4. Transducer mount
Easy-peasy. Get a 1/4” drill bit and drill two holes through the bracket. Attach the transducer mount that comes with the transducer and secure it with the bolts, nuts, and washers. Shortest step ever.
5. Pulling the wire to the console
Not as short, but still easily doable if you have a friend to help you. For this step, you’ll pull the wire from the transducer to the console. Remember to first wrap the wire in the electrical conduit. Admittedly, it’s not 100% necessary, but it may very well extend the life of the wire by a few years. The vibrations from the boat’s movement result in rubbing the wire against sharp edges and whatnot, which in turn can cut the cable in no time. As such, we totally recommend this simple operation which only costs you a couple of dollars and a few minutes.
The siding of your pontoon boat is most likely held into place by only 10 screws or so. While your friend holds one end of the siding so it doesn’t flop down and get bent, remove all screws and place them on the deck right above their respective holes. This will help you put them back easier. It may seem like a difficult process, but in fact it’s pretty easy.
Take a look and see where the wires installed by the manufacturer go through. This will be on the same side as the captain’s console, most often the starboard. Make sure you have enough room for the transducer cable and conduit. Once you’ve done that, fish the wire through wherever the other wires go until you get to the captain’s console.
6. Monitor mount
 Here’s where stuff gets real: you’ll have to drill a couple of holes through your dash. As such, go back to the saying on step 2: think thrice, measure twice, and cut once. Well, drill. Put the monitor’s bracket on the dash and mark the location of 4 holes with a pencil. Use progressive drill bits, so the fiberglass doesn’t crack or chip, as it’s known to be fairly brittle in these cases. Go slowly; it will only take a couple of minutes anyway.
Put the rubber washers between the bracket and the dash. This will prevent any screeching and scratching between them, as well as water infiltrations. Run the bolts through the holes and secure them with nuts and metal washers on the other side. For extra security, add a drop of silicone. You’re never too waterproof.
Drill another hole, a bigger one this time, for the transducer cord and power cord. For aesthetic reasons, as well as to prevent rubbing between the wires and the sharp edges of the hole, you can use a rubber grommet.
7. Power up!
There are two methods to power your fish finder. One is the method intended by the manufacturer, which is connecting the unit directly to the battery. The other one is easier and safer IF it is done by your tech-savvy friend. At any rate, both options are only safe if done by someone in the business, so please get help from a professional or at least from someone with experience when doing this part. We’ll start with the latter option:
- Fuse box connection
If the fuse box of your boat comes with empty connectors, you’re in luck. If not, you can ask a professional or your tech-savvy friend what to do or go for the second option.
In the lucky event, you will need two power connectors matching the empty connectors on your fuse box. Simply connect them to the power cord of your fish finder on one end and to the fuse box on the other end. Done!
- Battery connection
If you don’t have empty slots on your fuse box or for whatever other reason, you can connect the fish finder straight to the battery. The original power cord is often too short and, if that’s the case, you’ll have to buy a longer cord (20’ on average).
Pull the power wires through the boat the same way you did with the transducer cord. Tie the wires to the battery: red on positive, black on negative. You can touch the contacts – just make sure not to touch both at the same time.
These are the two alternatives for getting your fish finder running. Please exercise extreme caution when attempting either, as the consequences of electrocution are unpleasant for both your electronics and your own body.
8. Put everything back together
Make sure to get all the screws and bolts in their places. If you have any extra, check everything from the beginning. If not, you can now go and enjoy the nice fishing trip you deserve.